Introduction:


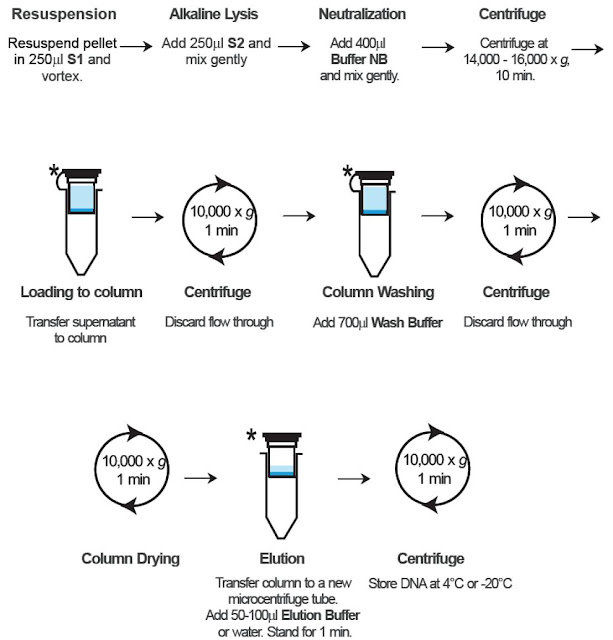
The GF-1 Plasmid DNA extraction kit is a device for extraction of plasmid DNA in a fast and efficient purification withoud the need for precipitation or organic extraction from lysates. This kit uses alkaline lysis-SDS method to lyse cells and release plasmid DNA.


plasmid DNA extraction kit


This device use a special-treated glass filter membrane fixed into a column to efficiently bind DNA in the presence of high salt. Special byffers provided in the kit are optimized to enhance binding of DNA.


Features:
- Yields up to 20µg of DNA
- Multiple samples can be processed rapidly in less     than 30  minutes
- No organic-based extraction required
- Highly pure plasmid DNA ready to use for routine   molecular biology applications such as restriction enzyme digestion, PCR, DNA sequencing, ligation, transformation, etc. 


Procedure: 


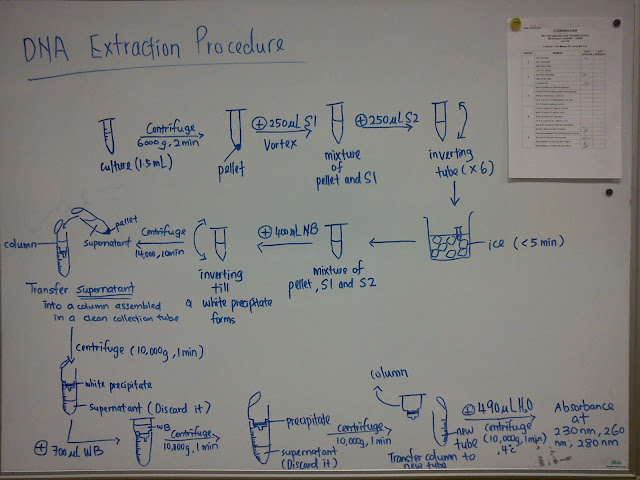
instruction from our lab instructor 

Result:


Discussion:

GF- 1 Plasmid DNA extraction kid is designed for rapid and efficient purification of high copy and low copy plasmid DNA withoud need for precipitation organic extraction. Plasmid are often used to purify a specific sequence, since they can easily be purified away from the rest of the renomw. For their uses as a vector, and for molecular cloning, plasmid often need to be isolated.There are several methods to isolate plasmid DNA from bacteria, the archetypes of which are the miniprep and the maxiprep. The former can be used to find out whether the plasmid is correct in any of several bacterial clones faster. The yield is a small amount of impure plasmid DNA, which is sufficient for analysis by restriction digest and for some cloning techniques.In the latter, much larger volumes of bacterial suspension are grown from which a maxi-prep can be performed. Essentially this is a scaled-up miniprep followed by additional purification. This results in relatively large amounts (several micrograms) of very pure plasmid DNA.


column-assembled collection tube

collection tube contain culture


Conclusion:

This report has identified that GF-1 Plasmid DNA extraction kit is the best,fast and efficient way to extract plasmid from DNA. This kit does not need precipitation or organic extraction from lysates and processes multiple samples in less than 30 minutes. Besides, GF-1 Plasmid DNA suitables for many molecular biology applications such as restriction enzyme digestion, PCR, DNA sequencing, ligation, and transformation.


References:


Introduction:

Multiwavelength ultraviolet/visible (Uv-vis) spectroscopy is a versatile,
quantitative, rapid, and reliable analytical tool that has immediate applications as a biosensor for the detection, identification, and enumeration of microorganisms and cells. The sample information contained in a spectrum includes cell size, chemical composition, shape, and information on their internal structure.  This information is
obtained from the spectroscopic analysis of  a sample measured over a broad range of wavelengths (200-900 nm) and/or with the scattered light measured at one or many different angles. The potential to extract  large amounts of information from a single multiwavelength measurement makes Uv-vis spectroscopy a powerful characterization
tool. In addition, process Uv-vis spectrometers and miniaturized systems, make this technique readily available for real-time in situ monitoring of biological, and environmental processes.

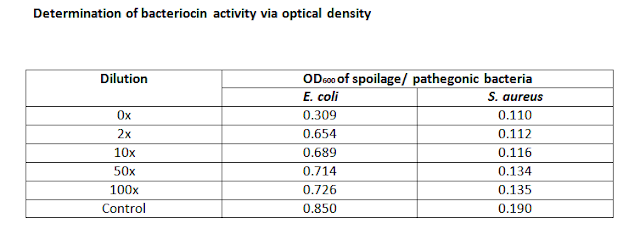
Bacteriocins comprise a large and diverse group of ribosomally synthesised antimicrobial proteins or peptides. Although bacteriocins can be found in numerous Gram-positive and Gram-negative bacteria, those produced by lactic acid bacteria (LAB) have receive special attention in recent years due to their poential application in the food industry as natural biopreservatives. Different classes of LAB bacteriocin have been identified on the basis of biochemical and genetic characterization. These bacteriocins have been reported to inhibit the growth of Listeria monocytogenes, Staphylococcus aureus, Enterococcus faecalis and Clostridium tyrobutyricum.

preparation of sample

prepared sample


Result:


Discussion:

Multiwavelength Uv-vis spectra of microorganisms and cell suspensions contain quantitative information on their properties such as number, size, shape, chemical composition, and internal structure. These properties are essential for the identification and classification of cells.  The complexity of microorganisms in terms of their chemical
composition and internal structure make the interpretation of their spectral signature a difficult task. In this lab report  proposed for the interpretation of the multiwavelength spectra of microorganisms.
The optical properties as functions of wavelength, and available literature data on the size and chemical composition of E. coli cells and S. aureus have been used to explore the sensitivity of the calculated spectra to the model parameters. It is shown that the proposed model can reproduce the features of experimentally measured spectra. The sensitivity of the spectra to the model parameters suggests that the proposed model can be used for the quantitative deconvolution of the
Uv-vis spectra in terms of critical information necessary for the detection and identification of microorganisms.  


An anti-microbial is a substance that kills or inhibits the growth of microorganisms such as bacteria, fungi, or protozoans. Antimicrobial drugs either kill microbes (microbiocidal) or prevent the growth of microbes (microbiostatic). Disinfectants are antimicrobial substances used on non-living objects or outside the body.
A drug used to treat a microbial infection. "Antimicrobial" is a general term that refers to a group of drugs that includes antibiotics, antifungals, antiprotozoals, and antivirals.

Conclusion:

A model for the interpretation of the multiwavelength Uv-vis spectra of microorganisms and cells has been formulated. The proposed interpretation model is based on light scattering theory, spectral deconvolution techniques, and on the approximation of the
frequency dependent optical properties of the basic constituents of living organisms.


Reference:


Introduction:

A microorganism or microbe is an organism that is unicellular or lives in a colony of cellular organisms. Microorganisms contamination is a situation which occurs when microorganisms end up in a location where they are not supposed to be. It is often used to refer to contamination of food by bacteria which can cause disease, but microorganisms contamination can also occur in other settings. This situation is not desirable, because it can pose a health threat and cause other problems. As microorganisms, particularly bacteria, are found practically everywhere, this means in most cases the reduction of harmful microorganisms to acceptable levels. However, in some cases it is required that an object or substance be completely sterile, i.e. devoid of all living entities and viruses.
Although a number of microorganisms are present in air, it doesn't have an indigenous flora. Air is not a natural environment for microorganisms as it doesn't contain enough moisture and nutrients to support their growth and reproduction.
In food preparation microorganisms are reduced by preservation methods (such as the addition of vinegar), clean utensils used in preparation, short storage periods or by cool temperatures. If complete sterility is needed, the two most common methods are irradiation and the use of an autoclave, which resembles a pressure cooker. There are no conditions where all microorganisms would grow, and therefore often several different methods are needed. 


Preparation of the sample


Result:


All petri dish after incubate at 37°C for 48 hours

A petri dish contain wash water


collecting sample from ear


Disscusion:


Air currents may bring the microorganisms from plant or animal surfaces into air. These organisms may be either commensals or plant or animal pathogens. However, the transmission of animal diseases is not usually important in outside air.

The main source of airborne microorganisms is human beings. Their surface flora may be shed at times and may be disseminated into the air. Similarly, the commensal as well as pathogenic flora of the upper respiratory tract and the mouth are constantly discharged into the air by activities like coughing, sneezing, talking and laughing. The microorganisms are discharged out in three different forms which are grouped on the basis of their relative size and moisture content. They are droplets, droplet nuclei and infectious dust.
Everyone knows that flu viruses and cold germs can congregate on hands. Also found on the hands are the bacteria that cause gastrointestinal problems. One of the most common types of bacteria known to man is staph. Because in recent years staph is becoming increasingly resistant to antibiotics which can prove deadly, washing your hands is more than good hygiene, it can save your life.

The respiratory system is open to airborne microbes and to outside pollution.It is not surprising that respiratory diseases occur, in spite of the body's defenses. Some respiratory disorders are relatively mild and, unfortunately, very familiar. We all experience the excess mucus, coughing, and sneezing ofthe common cold from time to time. The common cold is an example of rhinitis, an inflammation of the epithelium lining the nose and nasal cavity. Viruses, bacteria, and allergens are among the causes of rhinitis. Other respiratory disorders include laryngitis, pneumonia, bronchitis, chronic obstructive pulmonary disease, and lung cancer.

The cough reflex is a vital part of the body's defence mechanisms. Normally, the lungs and the lower respiratory passages are sterile. If dust or dirt get into the lungs, they could become a breeding ground for bacteria and cause pneumonia or infection in the breathing tubes. When a person coughs, there is a short intake of breath and the larynx (the voice box) closes momentarily. The resulting blast of air comes out at high speed, scrubbing and clearing the airway of dust, dirt or excessive secretions.

Conclusion:


  • Bacteria are everywhere and can spread from surface to surface, person to person, food to food, and person to food. Harmful bacteria can be controlled by practicing the 4 Cs of food safety. To prevent the spread of harmful bacteria, proper cleaning of both hands and surfaces is especially important.  The good thing is that not all bacteria are harmful; most bacteria are beneficial to us.
  • When designing experiments, you should always use safe techniques when working with bacteria. Also, it's important to have a control plate. In this experiment, you also learned that different strains of bacteria can be identified through colony morphology.
References:

http://www.ageds.iastate.edu/meat/topic1/bacteriaeverywhere.htm

  Lab 3: Preparation and sterilization of culture.


Introduction

A growth medium or culture medium is a liquid or gel designed to support the growth of microorganisms or cells, or small plants like the moss Physcomitrella patens. There are different types of media for growing different types of cells.
There are two major types of growth media: those used for cell culture, which use specific cell types derived from plants or animals, and microbiological culture, which are used for growing microorganisms, such as bacteria or yeast


Figure 1 An agar plate with microorganisms isolated from a deep-water sponge

This is an undefined medium because the amino acid source contains a variety of compounds with the exact composition being unknown. Nutrient media contain all the elements that most bacteria need for growth and are non-selective, so they are used for the general cultivation and maintenance of bacteria kept in laboratory culture collections.

Physcomitrella patens plants growingaxenically on agar plates (Petri dish, 9 cm diameter).
An undefined medium (also known as a basal or complex medium) is a medium that contains:

                                  1. a carbon source such as glucose for bacterial growth
                                  2. water
                                  3. various salts needed for bacterial growth
                                  4. Defined media (also known as chemically defined media or 
                                      synthetic media)
                                  5. all the chemicals used are known does not contain any yeast, 
                                      animal or plant tissue.
                                  6. Differential medium
                                  7. some sort of indicator, typically a dye, is added, that allows for the 
                                      differentiation of particular chemical reactions occurring during growth.


Figure 2 Physcomitrella patens plants growing axenically in vitro on agar plates (Petri dish, 9cm diameter)


An autoclave is a device used to sterilize equipment and supplies by subjecting them to high pressure saturated steam at 121 °C or more, typically for 15–20 minutes depending on the size of the load and the contents. It was invented by Charles Chamberland in 1879, although a precursor known as thesteam digester was created by Denis Papin in 1679. The name comes from Greek auto-, ultimately meaning self, and Latin clavis meaning key — a self-locking device.
Condition: 134 °C for 3 minutes or 121 °C for 15 minutes


Figure 3 Autoclave in our lab


Figure 4 Control panel for the autoclave


Discussion

Preparation:

1.            Nutrient Agar                                                     250ml
2.            Sterile Water                                                     100ml
3.            Sterile Beaker                                                    (1 bottle = 250ml)
4.            1 ml & 5 ml Pipette tips                                      (1 box each)
5.            Double Strengh MRS broth                                100ml
6.            Peptone                                                             250ml
7.            Universal bottles + paper                                  (1 bottle + 10 pieces of paper disk)
8.            Forcep                                                               1
9.            TSA Agar (A)                                                       200ml
10.          BHI Agar (B)                                                       200ml
11.          Centrifuge Tubes (C)                                         (15 ml x 30)
12.          Sterile universal bottle (D)                                30 bottles
13.          MRS broth (E)                                                    500ml dispense into 60 bottles
                                                                                         of universal bottle


Figure 4 MRS Brooth powder


Preparation of MRS broth:

To prepare 100ml of MRS broth solution:

Single strenght                                                                  52.25g / 10 = 5.225g
Double strength                                                                 5.225g x 2 = 10.45g

To prepare Nutrient agar:

1000ml of nutrient agar solution need 28g of nutrient agar powder
250ml of solution need 7 g of nutrient agar powder.

Nutrient agar is a microbiological growth medium commonly used for the routine cultivation of non-fastidious bacteria. It is useful because it remains solid even at relatively high temperatures. Also, bacteria grown in nutrient agar grows on the surface, and is clearly visible as small colonies. In nutrient broth, the bacteria grows in the liquid, and is seen as a soupy substance, not as clearly distinguishable clumps.

A widely-used method for heat sterilization is the autoclave, sometimes called a converter. Autoclaves commonly use steam heated to 121–134 °C (250–273 °F). To achieve sterility, a holding time of at least 15 minutes at 121 °C (250 °F) or 3 minutes at 134 °C (273 °F) is required. Additional sterilizing time is usually required for liquids and instruments packed in layers of cloth, as they may take longer to reach the required temperature (unnecessary in machines that grind the contents prior to sterilization). Following sterilization, liquids in a pressurized autoclave must be cooled slowly to avoid boiling over when the pressure is released. Modern converters operate around this problem by gradually depressing the sterilization chamber and allowing liquids to evaporate under a negative pressure, while cooling the contents.
Proper autoclave treatment will inactivate all fungi, bacteria, viruses and also bacterial spores, which can be quite resistant. It will not necessarily eliminate all prions.
For effective sterilization, steam needs to penetrate the autoclave load uniformly, so an autoclave must not be overcrowded, and the lids of bottles and containers must be left ajar. Alternatively steam penetration can be achieved by shredding the waste in some Autoclave models that also render the end product unrecognizable. During the initial heating of the chamber, residual air must be removed. Indicators should be placed in the most difficult places for the steam to reach to ensure that steam actually penetrates there.
To ensure the autoclaving process was able to cause sterilization, most autoclaves have meters and charts that record or display pertinent information such as temperature and pressure as a function of time. Indicator tape is often placed on packages of products prior to autoclaving. A chemical in the tape will change color when the appropriate conditions have been met. Some types of packaging have built-in indicators on them.

Conclusion

This report has identified the correct way to prepare a culture media. In this report, the type of culture media used is nutrient agar which prepare suitable medium for microorganisms growth. In order to culture the microorganisms in the nutrient agar, few steps of sterilization was taken to avoid any contamination on the colony.
Autoclaving is the process used to sterilize the nutrient agar. The media was inserted into an autoclave which is a large pressure cooker. The chamber provided high temperature and pressurized steam.

References


LAB 2: Measurement and Counting of Cells Using Microscope

OCULAR MICROMETER

Introduction


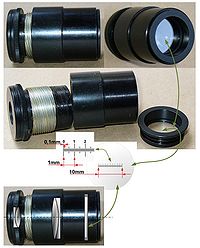
An ocular micrometer is a glass disk that attaches to a microscope's eyepiece. An ocular micrometer has a ruler that allows the user to measure the size of magnified objects. The distance between the marks on the ruler depends upon the degree of magnification. The ruler on a typical ocular micrometer has between 50 to 100 individual marks, is 2 mm long and has a distance of 0.01 mm between marks.


The main purpose of ocular micrometer is to measuer the size of microorganism. The ocular micrometer consists of 2 main scales that are stage scale and ocular scales.


To use this micrometer, we must loacte the ocular scale at the out microscope eyepiece to allow for measurements of objects being viewed. The other scale called stage scales locate at the special slide that contain scales.


Result

We use ocular micrometer to measure the bacterial cell under different magnification. 


Discussion


An ocular micrometer is a glass disk that attaches to a microscope's eyepiece. An ocular micrometer has a ruler that allows the user to measure the size of magnified objects. The distance between the marks on the ruler depends upon the degree of magnification. The ruler on a typical ocular micrometer has between 50 to 100 individual marks, is 2 mm long and has a distance of 0.01 mm between marks.


ocular micrometer


How to use a ocular micrometer


1.      Measure the actual size of the letter on the microscope slide using the millimeter ruler. This measurement will help you calibrate the ocular micrometer to determine if it is giving you accurate measurements.


2.      Attach the ocular micrometer to the microscope eyepiece by unscrewing the eyepiece cap, placing the ocular micrometer over the lens and screwing the eyepiece cap back into place. Some microscopes may have an ocular micrometer pre-installed, allowing you to skip this step


3.      Slide the stage micrometer onto the microscope slide stage. Adjust the microscope to the lowest possible magnification, which should bring the grid on the stage micrometer into focus.

stage ocular


4.      Move the stage micrometer until the measurement marks on the ocular micrometer align with the measurement marks on the stage micrometer. The measurement "0" on the ocular micrometer should line up with the measurement "0.0" on the stage micrometer.


5.      Count the number of measurement marks until the measurements of both the micrometers line up again. At 4x magnification (the lowest setting on most microscopes), the two micrometers will line up again at "3" on the ocular micrometer and "0.3" on the stage micrometer.


6.      Write down the number of measurement marks between the aligning measurements for the two micrometers. The distance between measurement marks is 0.01 mm, so you can now determine the distance between coinciding measurement marks. Repeat the exercise at higher magnifications (10x, 40x and 100x), and record these values as well.


7.      Use the calibrated ocular micrometer to measure the dimensions of the letter printed on your slide. Compare the dimensions to the dimensions you measured with the millimeter ruler to ensure that the ocular micrometer is functioning properly.


      Before using an ocular micrometer, we must calibrated it first. A typical scale consists of 50 - 100 divisions. You may have to adjust the focus of your eyepiece in order to make the scale as sharp as possible. If you do that, also adjust the other eyepiece to match the focus. Any ocular scale must be calibrated, using a device called a stage micrometer.A stage micrometer is simply a microscope slide with a scale etched on the surface. A typical micrometer scale is 2 mm long and at least part of it should be etched with divisions of 0.01 mm (10 µm).


   Suppose that a stage micrometer scale has divisions that are equal to 0.1 mm, which is 100 micrometers (µm). Suppose that the scale is lined up with the ocular scale, and at 100x it is observed that each micrometer division covers the same distance as 10 ocular divisions. Then one ocular division (smallest increment on the scale) = 10 µm at 100 power. The conversion to other magnifications is accomplished by factoring in the difference in magnification. In the example, the calibration would be 25 µm at 40x, 2.5 µm at 400x, and 1 µm at 1000x.Some stage micrometers are finely divided only at one end. These are particularly useful for determining the diameter of a microscope field. One of the larger divisions is positioned at one edge of the field of view, so that the fine part of the scale ovelaps the opposite side. The field diameter can then be determined to the maximum available precision.


Conclusion

1.   This report has identified the correct way to calibrate ocular micrometer.  Ocular micrometer has a ruler that allows the user to measure the size of magnified objects. A special slides which contains scales also used to place the objects being observed. Besides, this report also show how to calculate the scale using stage scale and ocular eyepiece. By learning these, small particles such as microorganisms or cell can be measure and the size can be compared. 
t

References


NEUBAUER CHAMBER

Introduction


A device used for determining the number of cells per unit volume of a suspension is called a counting chamber. The most widely used type of chamber is called a hemocytometer, since it was originally designed for performing blood cell counts.


It is essential to be extremely careful with higher power objectives, since the counting chamber is much thicker than a conventional slide. One entire grid on standard hemacytometers with Neubauer rulings can be seen at 40x (4x objective). The main divisions separate the grid into 9 large squares (like a tic-tac-toe grid). Each square has a surface area of one square mm, and the depth of the chamber is 0.1 mm. Thus the entire counting grid lies under a volume of 0.9 mm-cubed.
Suspensions should be dilute enough so that the cells or other particles do not overlap each other on the grid, and should be uniformly distributed. To perform the count, determine the magnification needed to recognize the desired cell type. 


Result


Discussion

Using a Counting Chamber
  1. To prepare the counting chamber the mirror-like polished surface is carefully cleaned with lens paper.    The coverslip is also cleaned.
  2. Coverslips for counting chambers are specially made and are thicker than those for conventional microscopy, since they must be heavy enough to overcome the surface tension of a drop of liquid.
  3. The coverslip is placed over the counting surface prior to putting on the cell suspension. The suspension is introduced into one of the H-shaped wells with a pasteur or other type of pipet.
  4. The area under the coverslip fills by capillary action. Enough liquid should be introduced so that the mirrored surface is just covered.
  5. The charged counting chamber is then placed on the microscope stage and the counting grid is brought into focus at low power.
  6. Here is a way to determine a particle count using a Neubauer hemocytometer. Suppose that you conduct a count as described above, and count 187 particles in the five small squares described.
  7. Each square has an area of 1/25 mm-squared (that is, 0.04 mm-squared) and depth of 0.1 mm. The total volume in each square is (0.04)x(0.1) = 0.004 mm-cubed. You have five squares with combined volume of 5x(0.004) = 0.02 mm-cubed.
  8. Thus you counted 187 particles in a volume of 0.02 mm-cubed, giving you 187/(0.02) = 9350 particles per mm-cubed. There are 1000 cubic millimeters in one cubic centimeter (same as a milliliter), so your particle count is 9,350,000 per ml.


Conclusion

This report has identified how to use the Neubauer Chamber. This special chamber is a heavy glass slide with two counting areas separated by a H-shaped trough. A special coverslip is placed over the counting areas. When the slide observed via microscope, the sample was viewed on the many grids.  These grids helps to count the cells under the microscope. 


 References


  1. www.ruf.rice.edu/~bioslabs/methods/.../cellcounting.html
  2. http://upload.wikimedia.org/wikipedia/commons/b/bf/Neubauer_improved_with_cells.jpg
  3. www.emsdiasum.com/microscopy/products/.../counting.aspx
  4. en.wikipedia.org/.../File:Neubauer_improved_counting_chamber.jpg
  5. www.mohfw.nic.in/.../IMPROVED%20NEUBAUER%20COUNTING%20CHAMBER.htm
  6. www.protocol-online.org/biology-forums-2/posts/15366.html


our COMMITMENT!!!!!!!