LAB 2: Measurement and Counting of Cells Using Microscope
OCULAR MICROMETER
Introduction
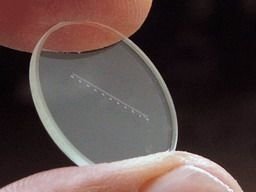
An ocular micrometer is a glass disk that attaches to a microscope's eyepiece. An ocular micrometer has a ruler that allows the user to measure the size of magnified objects. The distance between the marks on the ruler depends upon the degree of magnification. The ruler on a typical ocular micrometer has between 50 to 100 individual marks, is 2 mm long and has a distance of 0.01 mm between marks.

The main purpose of ocular micrometer is to measuer the size of microorganism. The ocular micrometer consists of 2 main scales that are stage scale and ocular scales.

To use this micrometer, we must loacte the ocular scale at the out microscope eyepiece to allow for measurements of objects being viewed. The other scale called stage scales locate at the special slide that contain scales.


Result
We use ocular micrometer to measure the bacterial cell under different magnification.

Discussion
An ocular micrometer is a glass disk that attaches to a microscope's eyepiece. An ocular micrometer has a ruler that allows the user to measure the size of magnified objects. The distance between the marks on the ruler depends upon the degree of magnification. The ruler on a typical ocular micrometer has between 50 to 100 individual marks, is 2 mm long and has a distance of 0.01 mm between marks.
An ocular micrometer is a glass disk that attaches to a microscope's eyepiece. An ocular micrometer has a ruler that allows the user to measure the size of magnified objects. The distance between the marks on the ruler depends upon the degree of magnification. The ruler on a typical ocular micrometer has between 50 to 100 individual marks, is 2 mm long and has a distance of 0.01 mm between marks.
 |
| ocular micrometer |
How to use a ocular micrometer
1. Measure the actual size of the letter on the microscope slide using the millimeter ruler. This measurement will help you calibrate the ocular micrometer to determine if it is giving you accurate measurements.
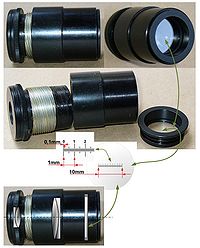
2. Attach the ocular micrometer to the microscope eyepiece by unscrewing the eyepiece cap, placing the ocular micrometer over the lens and screwing the eyepiece cap back into place. Some microscopes may have an ocular micrometer pre-installed, allowing you to skip this step
3. Slide the stage micrometer onto the microscope slide stage. Adjust the microscope to the lowest possible magnification, which should bring the grid on the stage micrometer into focus.
 |
| stage ocular |
4. Move the stage micrometer until the measurement marks on the ocular micrometer align with the measurement marks on the stage micrometer. The measurement "0" on the ocular micrometer should line up with the measurement "0.0" on the stage micrometer.
5. Count the number of measurement marks until the measurements of both the micrometers line up again. At 4x magnification (the lowest setting on most microscopes), the two micrometers will line up again at "3" on the ocular micrometer and "0.3" on the stage micrometer.
6. Write down the number of measurement marks between the aligning measurements for the two micrometers. The distance between measurement marks is 0.01 mm, so you can now determine the distance between coinciding measurement marks. Repeat the exercise at higher magnifications (10x, 40x and 100x), and record these values as well.
7. Use the calibrated ocular micrometer to measure the dimensions of the letter printed on your slide. Compare the dimensions to the dimensions you measured with the millimeter ruler to ensure that the ocular micrometer is functioning properly.
Before using an ocular micrometer, we must calibrated it first. A typical scale consists of 50 - 100 divisions. You may have to adjust the focus of your eyepiece in order to make the scale as sharp as possible. If you do that, also adjust the other eyepiece to match the focus. Any ocular scale must be calibrated, using a device called a stage micrometer.A stage micrometer is simply a microscope slide with a scale etched on the surface. A typical micrometer scale is 2 mm long and at least part of it should be etched with divisions of 0.01 mm (10 µm).

Suppose that a stage micrometer scale has divisions that are equal to 0.1 mm, which is 100 micrometers (µm). Suppose that the scale is lined up with the ocular scale, and at 100x it is observed that each micrometer division covers the same distance as 10 ocular divisions. Then one ocular division (smallest increment on the scale) = 10 µm at 100 power. The conversion to other magnifications is accomplished by factoring in the difference in magnification. In the example, the calibration would be 25 µm at 40x, 2.5 µm at 400x, and 1 µm at 1000x.Some stage micrometers are finely divided only at one end. These are particularly useful for determining the diameter of a microscope field. One of the larger divisions is positioned at one edge of the field of view, so that the fine part of the scale ovelaps the opposite side. The field diameter can then be determined to the maximum available precision.

Conclusion
1. This report has identified the correct way to calibrate ocular micrometer. Ocular micrometer has a ruler that allows the user to measure the size of magnified objects. A special slides which contains scales also used to place the objects being observed. Besides, this report also show how to calculate the scale using stage scale and ocular eyepiece. By learning these, small particles such as microorganisms or cell can be measure and the size can be compared.
t
References
http://www.ruf.rice.edu/~bioslabs/methods/microscopy/measuring.html
http://www.ehow.com/how_5019336_use-ocular-micrometer.html
http://www.ehow.com/how_5019336_use-ocular-micrometer.html
NEUBAUER CHAMBER
Introduction
A device used for determining the number of cells per unit volume of a suspension is called a counting chamber. The most widely used type of chamber is called a hemocytometer, since it was originally designed for performing blood cell counts.


It is essential to be extremely careful with higher power objectives, since the counting chamber is much thicker than a conventional slide. One entire grid on standard hemacytometers with Neubauer rulings can be seen at 40x (4x objective). The main divisions separate the grid into 9 large squares (like a tic-tac-toe grid). Each square has a surface area of one square mm, and the depth of the chamber is 0.1 mm. Thus the entire counting grid lies under a volume of 0.9 mm-cubed.
Suspensions should be dilute enough so that the cells or other particles do not overlap each other on the grid, and should be uniformly distributed. To perform the count, determine the magnification needed to recognize the desired cell type.

Result


Discussion
Using a Counting Chamber
- To prepare the counting chamber the mirror-like polished surface is carefully cleaned with lens paper. The coverslip is also cleaned.
- Coverslips for counting chambers are specially made and are thicker than those for conventional microscopy, since they must be heavy enough to overcome the surface tension of a drop of liquid.
- The coverslip is placed over the counting surface prior to putting on the cell suspension. The suspension is introduced into one of the H-shaped wells with a pasteur or other type of pipet.
- The area under the coverslip fills by capillary action. Enough liquid should be introduced so that the mirrored surface is just covered.
- The charged counting chamber is then placed on the microscope stage and the counting grid is brought into focus at low power.
- Here is a way to determine a particle count using a Neubauer hemocytometer. Suppose that you conduct a count as described above, and count 187 particles in the five small squares described.
- Each square has an area of 1/25 mm-squared (that is, 0.04 mm-squared) and depth of 0.1 mm. The total volume in each square is (0.04)x(0.1) = 0.004 mm-cubed. You have five squares with combined volume of 5x(0.004) = 0.02 mm-cubed.
- Thus you counted 187 particles in a volume of 0.02 mm-cubed, giving you 187/(0.02) = 9350 particles per mm-cubed. There are 1000 cubic millimeters in one cubic centimeter (same as a milliliter), so your particle count is 9,350,000 per ml.

Conclusion
This report has identified how to use the Neubauer Chamber. This special chamber is a heavy glass slide with two counting areas separated by a H-shaped trough. A special coverslip is placed over the counting areas. When the slide observed via microscope, the sample was viewed on the many grids. These grids helps to count the cells under the microscope.
- www.ruf.rice.edu/~bioslabs/methods/.../cellcounting.html
- http://upload.wikimedia.org/wikipedia/commons/b/bf/Neubauer_improved_with_cells.jpg
- www.emsdiasum.com/microscopy/products/.../counting.aspx
- en.wikipedia.org/.../File:Neubauer_improved_counting_chamber.jpg
- www.mohfw.nic.in/.../IMPROVED%20NEUBAUER%20COUNTING%20CHAMBER.htm
- www.protocol-online.org/biology-forums-2/posts/15366.html
19:04 |
Category: |
1 comments


Comments (1)
Chúng tôi là nhà cung cấp hàng đầu về máy đo khoảng cách, panme đo ngoài, caliper điện tử, chà nhám rung máy, máy cắt sắt và nhiều hơn nữa giá cả phải chăng hơn nhiều.